As described earlier with other types of pull configurations, rebasing is the process of stashing your changes, updating your repository with the latest remote changes (while also checking for any merge conflicts), and then restoring your changes from the local stash. If any merge conflicts occur, you can sequentially resolve each conflict in any of the following ways:
- By keeping the remote changes and discarding your local changes.
- By keeping the local changes and discarding the remote changes.
- By keeping (and editing) both changes to combine modifications from both the local and remote repositories.
The following sections describe how to rebase your local repository and how to resolve any merge conflicts.
Rebasing your local repository
When you rebase your local repository, Git automatically moves your local changes to a temporary stash and then updates your local repository with the remote changes. Temporarily stashing your local changes ensures that the remote changes can be applied without any initial conflicts. Git then attempts to replay your stashed changes on top of the updated remote content, which either succeeds or generates a merge conflict.
Note In a collaborative author environment, you will perform this command frequently—at least once per day—and possibly several times per day to update your repository with your team's recent changes.
To rebase your local repository
- In your operating system, navigate to the top-level directory of the cloned Git repository on your local machine.
- Right-click the directory, and then click Git Bash Here on the shortcut menu.
- At the prompt, type the following command:
git pull --rebase --autostash
The possible outcomes of this command are similar to when performing the git pull command, except when a merge conflict occurs, as shown below:
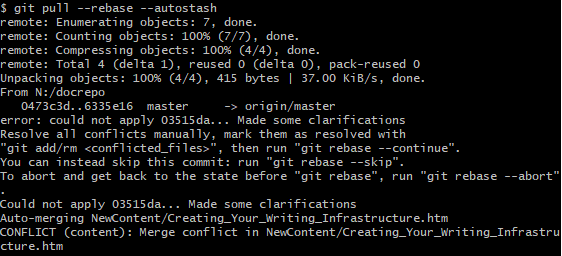
In this case, you must resolve the merge conflict before completing the rebase, as described in the next section.
Resolving merge conflicts that occur during a rebase
When a merge conflict occurs during a rebase, Git automatically updates the file(s) containing any conflicts to include both the local and the remote conflicting changes, encapsulated by merge markers. For example, the following content shows an HTML topic containing a bullet list that has been modified by two different authors:
HTML
<<<<<<< HEAD
<li class="Num">A source control system that backs up all content and stores writing revisions.</li>
<li class="Num">A help-authoring tool that enables content formatting and creation of all necessary output formats.</li>
=======
<li class="Num">A version control system that backs up all content and stores writing revisions.</li>
<li class="Num">A content management system that enables content formatting and creation of all necessary output formats.</li>
>>>>>>> 03515da (Clarified tools)In this case, the first author's changes pushed to the remote server successfully, without any conflict. However, when the second author attempted to push their changes, Git automatically edited the file and included both the remote server's changes (designated by the <<<<<<< HEAD marker), a line of equal signs to designate the end of the remote changes and the beginning of the local changes, and a terminating marker containing the Git commit ID and commit message from the local repository. The latter marker designates the end of the merge conflict (>>>>>>> 03515da (Clarified tools)).
Important Because Git added merge conflict markers, the local file is no longer valid HTML. If you were to try to display the modified topic in a Help system or browser, it would fail to render the content. Consequently, it is important to resolve all merge conflicts before pushing your changes to the remote server; otherwise you could introduce invalid files that still contain merge conflicts to the remote repository.
This section describes how to resolve merge conflicts that occur during rebasing, and then complete the rebase operation.
Tip Although you can resolve merge conflicts in any text editor, some editors simplify the process by including efficient controls for resolving conflicts. For example, the following procedure shows how to resolve a merge conflict using Visual Studio Code which simplifies merge conflict resolution by:
- Adding hyperlinks to merge conflict occurrences, allowing you to easily select which set of changes you want to keep.
- Automatically removing merge conflict markers when you select a set of changes to keep.
- Displaying vertical-scroll bar hotspots that help you easily navigate to merge conflicts in lengthy files.
To resolve merge conflicts
- Using a text editor, open a file containing a merge conflict.
The files containing conflicts are listed in the error message that interrupts the rebase operation. You can also type git status to see a clear list of conflicting files, for example:
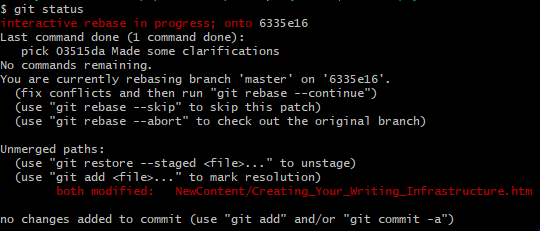
In this case, a single file (NewContent/Creating_Your_Writing_Infrastructure.htm) contains merge conflicts.
- Scroll to the first conflict (or search for the markers <<<< to easily locate the next conflict).
When using the Visual Studio Code editor, merge conflicts include colored highlighting and hyperlinks (above the conflict) for easy conflict resolution as shown:
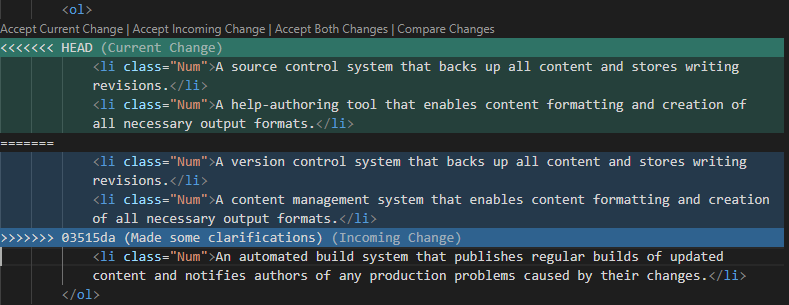
- You can resolve the merge conflict by keeping the remote server changes (shown in green and designated with the HEAD marker), by keeping the local changes (shown in blue), or by keeping both and then editing the content to create valid HTML.
For example, clicking the Accept Current Change hyperlink automatically keeps the remote server changes and discards the local changes and conflict markers as shown:

Alternatively, clicking Accept Both Changes retains all conflicting content and requires you to further edit the source file to create a custom merge of the changes.
- If the current file contains additional merge conflicts, repeat steps 2 through 3 to resolve all remaining conflicts in the file.
- Save and close the updated file, which is now free of merge conflicts.
- If merge conflicts occurred in multiple files, repeat steps 1 through 5 to resolve all merge conflicts in all files. Otherwise, continue to the next step.
- At the Git Bash prompt, type the following command to indicate that you have resolved the merge conflicts in all outstanding files:
git add -A
A subsequent git status command indicates that a rebase is in progress, and that all conflicts have been fixed as shown:

- To complete the rebase, type the following command:
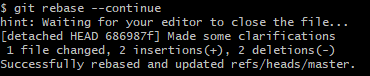
git rebase --continue
In this case, Git commits the resolved merge conflicts in your local repository and opens an editor for you to describe the conflict resolution.
- Enter a description of the conflict resolution, and then save and close the editor.
The rebase is now complete, as shown:
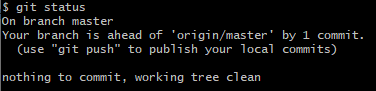
Note Although you have completed rebasing, you have only resolved the merge conflict and committed your changes in your local repository, as shown by a subsequent git status command:
- Consequently, you must use a subsequent git push command to push your local commit to the remote repository and update it with your changes as shown:
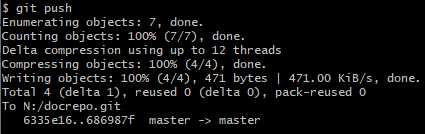
You have now successfully rebased, resolved all merge conflicts, and updated the remote repository with all of your local changes.
To make working with Git version control easier, let's look at how to set up some command shortcuts known as aliases.