To add file changes to version control, you first stage the changes in your local repository, and then commit and push the changes to the remote Git server. Staged changes can include newly added files, file modifications, and file deletions. Committing your changes groups them with a unique identifier and allows you to enter a descriptive comment that becomes part of the repository history (which allows you to easily find and recover the changes later). When you push your changes to the remote repository, they become accessible to other writers who have their own cloned copy of the repository.
Note
- When you delete files from version control, the earlier file versions are retained in the remote repository's history and can still easily be recovered.
- There are multiple ways to work with Git version control including from a command prompt, from a Git utility with a graphical interface, or from an integrated authoring tool. The following procedure describes how to perform version control operations from a command prompt.
To add files changes to version control using a command prompt
- In your operating system, navigate to the top-level directory of the cloned Git repository on your local machine.
- Right-click the directory, and then click Git Bash Here on the shortcut menu.
- At the prompt, type the following command to display the current status of your local Git repository:
git status
Any modifications you've made to the local repository are displayed in red text. For example, after you have created a new .gitignore file in the repository's top-level directory, the command returns the response:
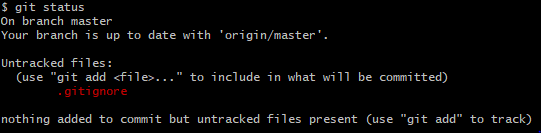
The response indicates that a new file (.gitignore) is present in the local repository. The file is untracked, because it has not yet been added to version control.
- To stage the changes for inclusion in the remote repository, type the command:
git add -A
This command stages all modifications in all directories of the repository for inclusion in the remote repository. After entering this command, a subsequent git status command returns the result:
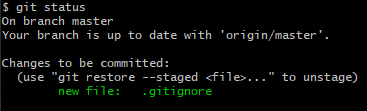
The .gitignore file now displays in green text, indicating that it is staged for inclusion in the remote repository (in this case, as a new file).
- To commit your changes, type the command:
git commit -m "Commit message"
where Commit message is a descriptive comment describing your changes; this comment allows you to identify your changes from a historical list of repository modifications. For example, the following command commits the addition of the .gitignore file:

Tip As a best practice, if your writing team tracks documentation updates using a change request tracking system, then include the identifier of the change request that you are currently working on in the commit message. This associates the file updates in the repository with the change request that describes those updates. (If you track documentation issues using the Issues tab on your repository's GitHub page, then you can link issues to your commit by adding the following syntax to your commit message:
#issue_number
In this message, issue_number is the integer number of a specific issue logged for the repository in GitHub.
If you want to close an open issue at the same time you commit your changes, you can include this syntax in the commit message:
fixes #issue_number
or
resolves #issue_number
After committing the file, a subsequent git status command indicates that your local repository is now one commit ahead of the remote repository:

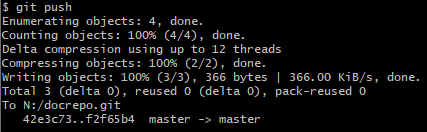
- To push your committed changes to the remote repository, type the command:
git push
If there haven't been any other changes to the remote repository since the last time you updated your local repository, then the push command succeeds:
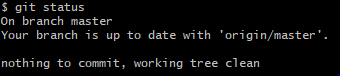
A subsequent git status command then shows that your local repository is now up to date with the remote repository:
Note If another author has made changes to the remote repository since the last time you updated your local repository, the push command fails with an error, such as:
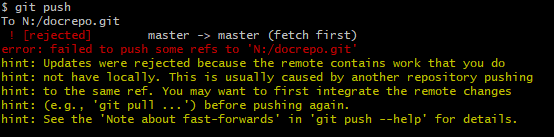
In this case, you must first update your local repository with those changes (and check for any merge conflicts) before you can push your changes to the remote repository. For more information, see Updating your local repository and Rebasing and resolving merge conflicts.